
The Board: Terrain, Regions and Settlements
The Promised Land board is a hex map. Every hex has a terrain, which sets the cost of crossing it and which events can strike it. On top of that map sit the settlements — the villages and cities that generate income and that, grouped into regions, are worth the game’s victory points.
Terrain Types
There are four types, identified by the colour of the hex:
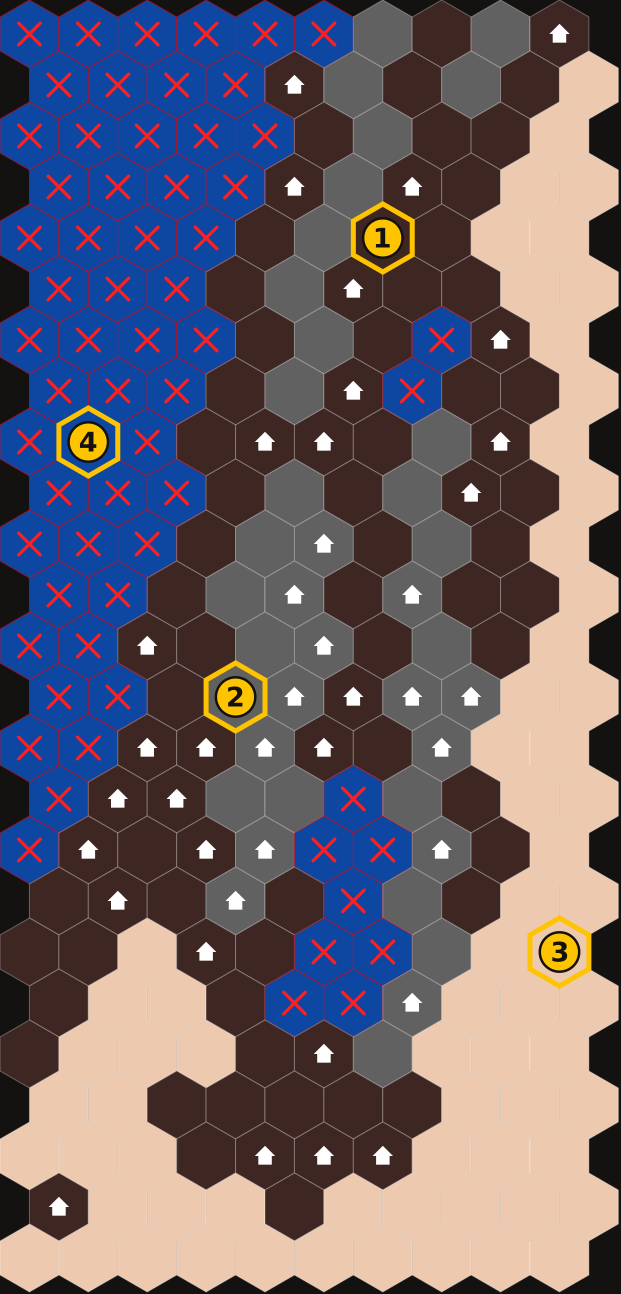
| No. | Terrain | Colour on the map | Movement cost |
|---|---|---|---|
| 1 | Plain | Dark brown | 1 point |
| 2 | Mountains | Grey | 2 points |
| 3 | Desert | Sand | 2 points |
| 4 | Water | Blue (with a red ✕) | Impassable |
1. Plain
The most common terrain on the map and the cheapest to cross: 1 movement point per hex. Most villages sit on the plains, and it is the terrain that allows the longest marches in a single round.
The plain is also the only terrain with a direct effect in combat: a general carrying the Chariot gains +3 strength when fighting on the plains — but only in the open field, never inside a settlement.
During the Announcements phase, an event card lands on the plains when the six-sided die rolls a 1 or 2.
2. Mountains
Rough ground: entering a mountain hex costs 2 movement points, twice a plain. A mountain range acts as a natural barrier — crossing one eats up a slow general’s entire round, which makes mountains a good line of defence between regions.
Beyond the cost, mountains impose no restrictions: generals may stop, fight, and defend on them normally.
During the Announcements phase, an event card lands on the mountains when the die rolls a 3 or 4.
3. Desert
Entering a desert hex also costs 2 movement points. The desert covers the eastern belt and the southern edge of the map.
What makes the desert dangerous is the Sandstorm: of the four event cards, it is the only one tied to a fixed terrain — it always lands in the desert and is never rolled onto another. While a sandstorm is active:
- Every desert hex and every hex adjacent to a desert hex is sealed. They are marked on the map with a red ✕.
- No general may enter, leave, or cross a sealed hex. A general standing on one cannot move at all that round.
- No combat takes place on desert hexes that round. (Adjacent hexes are blocked for movement only; combat there resolves normally.)
The single-use Secret Passage card ignores this seal for one move, letting a general enter or leave the desert during the storm. The sandstorm expires after one round.
During the Announcements phase, the other event cards land in the desert when the die rolls a 5 or 6.
4. Water
Water is impassable. No general may enter or cross a water hex under any circumstances — there are no boats, and no card lifts the restriction. That is why every water hex is permanently marked with a red ✕, showing it is out of play.
Water holds no settlements, generates no income, and never receives event cards. Its role is geographic: the great sea to the west defines the coast, and the inland waters narrow the passages through the centre of the map, creating chokepoints worth defending.
Movement Rules
Every general has a movements value printed on their card (2, 3, or 4, depending on the general). That value is the total number of points they may spend in the Movement phase, and each hex’s cost is charged on entering it. The game always works out the cheapest route to the chosen destination.
Some examples with a 3-point general:
- 3 plain hexes (1 + 1 + 1);
- 1 plain and 1 mountain (1 + 2);
- 1 mountain and 1 desert would be 4 points — out of range.
Beyond terrain cost, other rules limit where a general may go:
- Enemy or neutral settlements may be the destination of a move (that is how you attack them), but they cannot be crossed to reach hexes beyond.
- A hex **under siege** by another player is sealed: no general enters or leaves it — except those of the player conducting the siege. A besieged general cannot move.
- A settlement already holding a player’s maximum of 2 defending generals will not accept another.
- During a Sandstorm, the desert and its fringe are sealed (see above).
- A **captive general**, moved by their captor, may never enter a hex holding an enemy presence: they can only be marched through friendly or empty territory.
- The Secret Passage waives both the siege seal and the sandstorm seal for a single move.
Terrain and Events
During the Announcements phase, each card in the Events Area is rolled onto a terrain with a six-sided die — 1-2 plain, 3-4 mountains, 5-6 desert. Water never receives events. When a prophet is in play, their owner chooses each card’s terrain instead of rolling (the Sandstorm stays tied to the desert).
The terrain struck determines who suffers the effect:
- Abundance — each settlement on that terrain earns +1 income for the round.
- Hunger — each settlement on that terrain earns −1.
- Plague — rolls against every garrison and every general standing on that terrain.
- Sandstorm — seals the desert, as described above.
Regions
A region is not a contiguous area of the map: it is a named group of settlements. An empty hex’s terrain never belongs to any region — only villages and cities carry that mark. On the board, a region shows as a coloured dashed ring around each of its settlements.
Of the map’s 40 settlements, 31 belong to one of the six regions and 9 belong to none.
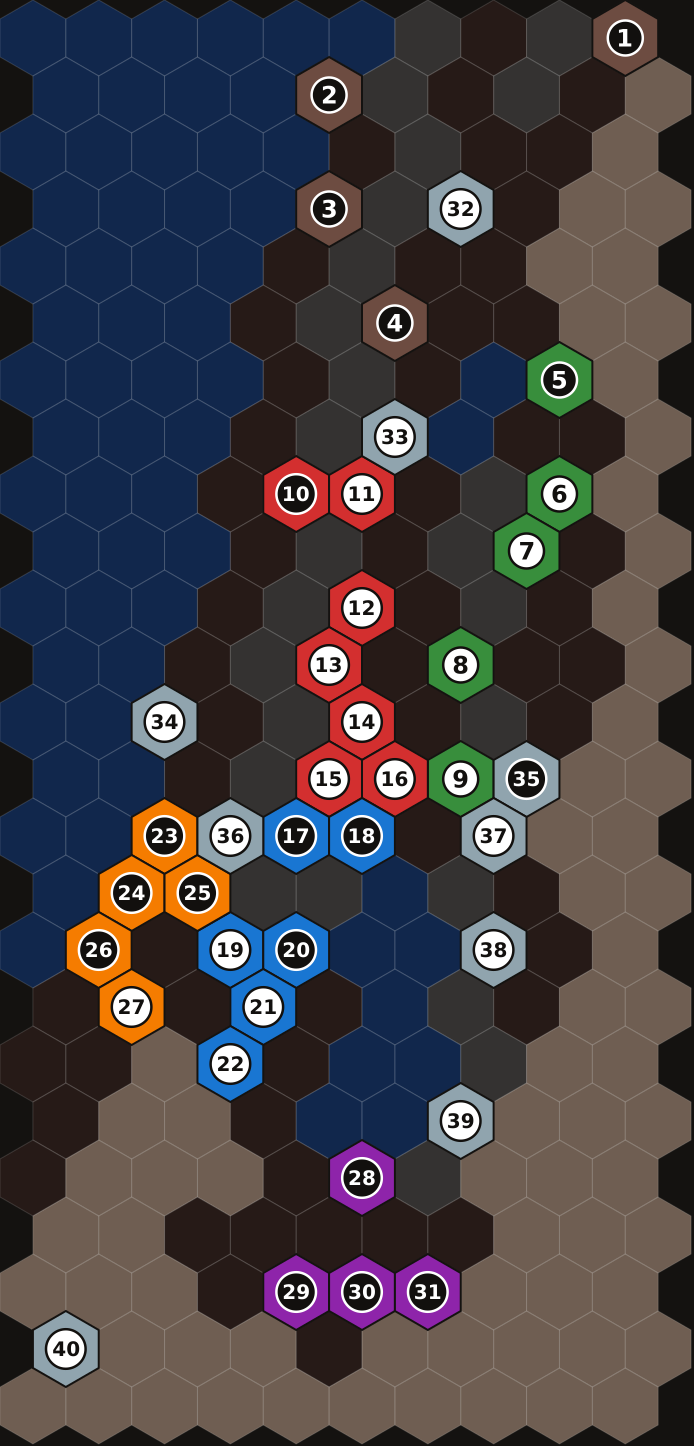
On the map above, each region uses the colour the game itself uses in its legend. The number identifies the settlement in the tables below, and the colour of the badge shows its starting situation:
- White badge — settlement free at the start of the game.
- Black badge — settlement held by the Canaanites at the start of the game.
Why regions matter
A region is the path to a **Judge title**, worth 1 victory point (and 3 are needed to win). To buy a region’s title during the Acquisitions phase, for 10 coins, all of these must hold at once:
- the region has at least 4 settlements;
- there is no judge in that region yet, and it has no city yet;
- you control every settlement of the region — no exceptions;
- you own a walled village there, which will become the judge city;
- you have a free general (not captive) who does not already hold another title.
The 9 region-less settlements never grant any title: they are worth their income and strategic position, and count toward no judge’s eligibility.
There is also an end-game condition tied to regions: once fewer than 3 regions can still support a judge (each needs 4 standing settlements), the game ends and everyone loses — razing too many settlements ruins the board for all players.
Settlements by region
Some settlements only exist from a certain player count upward. The count includes every player, computer-controlled ones included, and does not count the neutral Canaanite tribe.
Canaanite-held settlements start the game with 1 wall and a garrison set by the difficulty chosen when the game is created (Weak 1 troop, Medium 2, Strong 4).
🟤 Syrophoenicia — 4 settlements, all Canaanite
| No. | Settlement | Terrain | Start |
|---|---|---|---|
| 1 | Damascus | Plain | Canaanite |
| 2 | Sidon | Plain | Canaanite |
| 3 | Tire | Plain | Canaanite |
| 4 | Hatzor | Plain | Canaanite |
With exactly 4 settlements the region sits at the bare minimum for a judge — and every one of them has to be taken from the Canaanites.
🟢 Gilead — 5 settlements, 1 Canaanite
| No. | Settlement | Terrain | Start |
|---|---|---|---|
| 5 | Astaroth | Plain | Canaanite |
| 6 | Edrei | Plain | Free |
| 7 | Ramote-Gileade | Plain | Free |
| 8 | Mahanaim | Mountains | Free |
| 9 | Jazer | Mountains | Free |
🔴 Israel — 7 settlements, 1 Canaanite
| No. | Settlement | Terrain | Start |
|---|---|---|---|
| 10 | Megiddo | Plain | Canaanite |
| 11 | Jezreel | Plain | Free |
| 12 | Tirza | Mountains | Free |
| 13 | Shechem | Mountains | Free |
| 14 | Shiloh | Mountains | Free |
| 15 | Bethel | Mountains | Free |
| 16 | Gilgal | Plain | Free |
The largest region on the map: seven settlements to control, but only one in Canaanite hands.
🔵 Judah — 6 settlements, 3 Canaanite
| No. | Settlement | Terrain | Start |
|---|---|---|---|
| 17 | Jerusalem | Mountains | Canaanite |
| 18 | Jericho | Plain | Canaanite |
| 19 | Lachish | Plain | Free |
| 20 | Hebrom | Mountains | Canaanite |
| 21 | Debir | Mountains | Free |
| 22 | Berseba | Plain | Free |
🟠 Philistia — 5 settlements, 4 Canaanite
| No. | Settlement | Terrain | Start |
|---|---|---|---|
| 23 | Ashdod | Plain | Canaanite |
| 24 | Ashquelom | Plain | Canaanite |
| 25 | Gate | Plain | Canaanite |
| 26 | Gaza | Plain | Canaanite |
| 27 | Gerar | Plain | Free |
🟣 Edom — 4 settlements, all Canaanite (6-player games only)
| No. | Settlement | Terrain | Start |
|---|---|---|---|
| 28 | Zoar | Plain | Canaanite |
| 29 | Tamar | Plain | Canaanite |
| 30 | Zalmuna | Plain | Canaanite |
| 31 | Bosra | Plain | Canaanite |
Edom is the only region gated entirely on player count: its four settlements appear on the board only in 6-player games. With fewer players, the region simply does not exist.
⚪ No region — 9 settlements, 1 Canaanite
| No. | Settlement | Terrain | Start | Appears with |
|---|---|---|---|---|
| 32 | Dan | Plain | Free | always |
| 33 | Hamath | Plain | Free | 5+ players |
| 34 | Joppa | Plain | Free | 5+ players |
| 35 | Rabba | Mountains | Canaanite | 4+ players |
| 36 | Gezer | Plain | Free | 5+ players |
| 37 | Heshbon | Mountains | Free | 4+ players |
| 38 | Jaaza | Mountains | Free | 4+ players |
| 39 | Quirnaserete | Mountains | Free | 4+ players |
| 40 | Kadesh | Plain | Free | 6+ players |
These settlements pay income and hold valuable positions, but they never count toward a Judge title.
Settlement Types
There are two kinds of settlement — village and city — and the map tells them apart by their icon:
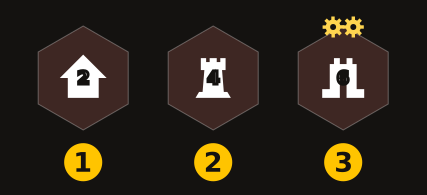
- Unwalled village — house icon.
- Walled village — tower icon. It is the same village: buying the wall changes the drawing.
- City — castle icon. The golden gears above it count the developments built there.
The number in the middle of the icon is the garrison: how many troops are stationed there.
One detail matters at setup: all 40 settlements on the board start as villages. There is no city at the beginning of the game — every city is the result of some player claiming a Judge title.
Differences in behaviour
| Village | City | |
|---|---|---|
| Base income per round | 1 coin | 2 coins |
| Defence bonus | +4, and only if it has a wall | +6, always (no wall needed) |
| Decay under siege | 4 → 2 → 0 (from the 3rd siege round) | 6 → 4 → 2 → 0 (from the 4th) |
| Loot value when destroyed | 20 coins | 30 coins |
| Judge title | cannot hold one | it is the region’s capital and holds the title (1 VP) |
| Tabernacle | cannot receive it | can receive it (only one per game) |
| How it comes about | on the board from the start | created by buying the Judge title on a walled village you own |
Beyond the numbers, a city behaves differently in three situations:
- A city is permanent. Once a walled village becomes a city, it never reverts to a village — not even if the region loses settlements and drops below the 4 a judge requires. The only way to remove a city is to raze it.
- Conquering the city conquers the title. Whoever takes a region’s capital city takes the Judge title with it, choosing which of their generals assumes it (or leaving it vacant, if they have no eligible general).
- Losing its owner suspends the title. If the city ends up with no owner — for example when a plague wipes out the whole garrison and no general stands on it — the region loses the Judge title, the icon reverts to white (unowned), and the victory point disappears.
Two income rules are worth remembering, and they apply to both types: a settlement under siege produces no income at all, and a settlement in a taxed region pays its owner nothing that round — the player who played the Tax card collects twice its value instead.
Settlement Improvements
Every improvement is bought during the Acquisitions phase (phase 4), and none of them can be bought in a settlement under siege.
| Improvement | Cost | Effect | Limit |
|---|---|---|---|
| Troop | 2 coins | Strengthens the garrison defending the settlement | 6 per settlement |
| Wall | 10 coins | +4 defence; makes the village eligible to become a judge city | 1 per settlement |
| Development | 6 coins | +2 income per round; +6 coins on loot | 2 per settlement and 7 on the whole board |
| Tabernacle | 30 coins | 1 victory point; unlocks Sacrifice for the Guilt | 1 in the entire game |
Walls
A wall is an improvement of presence, not of quantity: you can only build one per settlement, and one is all it ever offers. It grants +4 defence to the defending side, but that bonus melts under siege — worth +4 in the first round, +2 in the second, and zero from the third onward. That is why laying siege before storming pays off.
The wall bonus is also cancelled when the attacker plays Siege Weapons or enters the settlement with the Secret Passage. (The Ark’s bonus, by contrast, is cancelled by neither.)
Beyond defence, the wall plays a decisive role in the race for points: only a walled village can be chosen as the judge city. Without a wall, there is no way to turn control of a region into a victory point.
Canaanite settlements start the game already holding 1 wall.
Developments
Each development adds +2 coins of income per round to the settlement and appears as a golden gear above the icon. A settlement holds up to 2 developments.
The limit that bites hardest, though, is global: at most 7 developments may exist on the board at the same time, counting every player’s. Once the seventh is built, nobody can buy another until one is destroyed — which makes developments a contested resource rather than merely a question of having coins.
Developments also fatten the prize for whoever destroys the settlement: each one adds +6 coins to the loot.
Note that walls and developments survive conquest and pass to the new owner — taking a settlement means inheriting its improvements. The garrison, on the other hand, is wiped to zero.
The Tabernacle
The Tabernacle is the most restricted improvement in the game. To build it, for 30 coins, you need:
- one of your generals to be carrying the Ark;
- to control a city (a village will not do);
- no Tabernacle to exist anywhere in the game at that moment.
It brings two advantages:
- 1 victory point, valid while the general carrying the Ark stands on the Tabernacle’s hex. If the Ark walks away the point disappears — and returns when it comes back.
- Sacrifice for the Guilt: a new option in Acquisitions that lets you pay 20 coins to shed 3 points of the Wrath of God. In a game where the cup is nearing the brim, it is the only way to make the meter fall.
Since only one Tabernacle can exist per game, it is also a denial: while yours stands, no opponent can raise theirs. Razing the city that holds it frees the slot for another player; conquering that city transfers the Tabernacle to its new owner.
Links para esta página
- El Tablero: Territorios, Regiones y Asentamientos
- Judges and Kings
- O Tabuleiro: Territórios, Regiões e Assentamentos
- Promised Land — Game Manual
- The Acquisitions Phase
- The Announcements Phase
- The Combat Phase
- The Cup of the Wrath of God and the Invaders
- The Draw Cards Phase
- The Events Area
- The Game's Cards
- The Movement Phase
- The Player Boards